Gazelle Token Service
Gazelle Token Service - Installation & Configuration
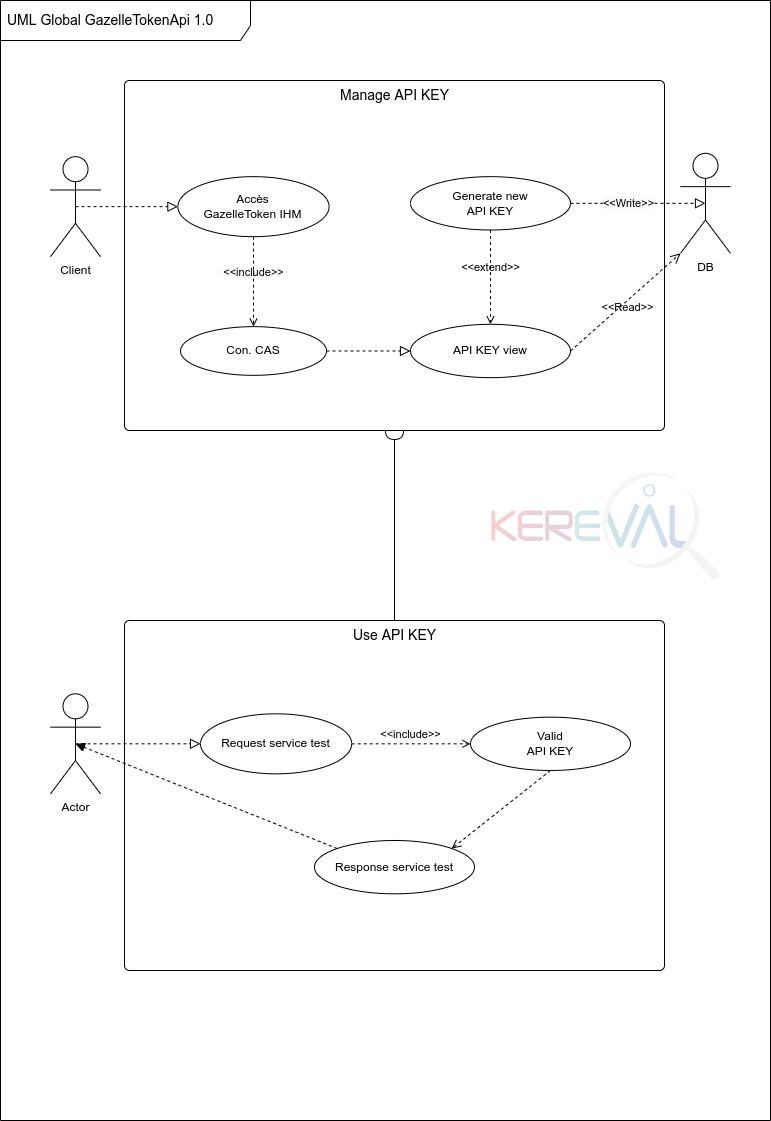
Gazelle Token Service is an open-source Java EE project used to calling various validation-services of e-Health standards.
Get Gazelle-Token-Service
Build from sources
Sources of this project are available on the INRIA GitLab; sources are managed using git. Anonymous access is available if you only want to retrieve the sources (read-only access). If you intend to build the tool and to install it on your own server, we recommend you to use a tagged version.
git clone --branch "TAG_VERSION" https://gitlab.inria.fr/gazelle/applications/core/gazelle-token.git
To retrieve the current version of the tool, take a look into the release notes of the project in Jira .
The project needs JDK 11 and Maven to be compiled.
mvn clean install
Once the compilation is over, the deployable artifact can be found in gazelle-token-service-ear/target/gazelle-token-service-ear.ear.
Or download the EAR from IHE artifact repository
Each version of EVSClient is published in IHE Gazelle Nexus repository.
gazelle-token-service-ear-X.X.X.ear is the artifact to download and deploy.
Installation
Pre-requisites
Gazelle Token Service requires JDK 11, JBoss AS 7.2.0-Final WildFly 18.0.1.Final+ and PostgreSQL to be run. Please refere to General considerations for WildFly 18 to install WildFly 18 and setup a compliant environment.
Create and initialize the database
You still need to create the database and the user.
This initialization is done by the scripts in gazelle-token-service-ear/src/main/resources/sql/:
schema-1.0.0.sql.
Note: Initial application preferences values (application_url, cas_enabled, …) should be provided as environment variables.
Default values could be found in /opt/gazelle-token/preferences.properties.</br>
If any of these variables is set, the corresponding preference in preferences.properties file will be overridden.
Data source
Data sources (configuration file that indicates how to connect to the database) must be defined in the WildFly application server. More information about how to configure data sources can be found here: WildFly datasources.
EVSClient will expect the JNDI datasource to be named: java:jboss/datasources/GazelleTokenDS.
A data source example and specific to Gazelle Token Service can be found in gazelle-token-service-ear/src/main/datasource
in the sources or in the archive gazelle-token-service-ear-X.X.X-datasource.zip that can be downloaded from
https://gazelle.ihe.net/nexus.
File system
A ZIP file is available at https://gazelle.ihe.net/nexus/#nexus-search;quick~gazelle-token-service (search for the last released gazelle-token-service-ear-X.X.X-dist.zip) that you can unzip in order to easily create all the required directories, starting at /opt.
wget -nv -O /tmp/gazelle-token-service-dist.zip "[*https://gazelle.ihe.net/nexus/service/local/repositories/releases/content/net/ihe/gazelle/gazelle-token-service-ear/X.X.X/gazelle-token-service-ear-X.X.X-dist.zip*](https://gazelle.ihe.net/nexus/service/local/repositories/releases/content/net/ihe/gazelle/EVSClient-ear/6.X.X/EVSClient-ear-6.X.X-dist.zip)"
unzip /tmp/gazelle-token-service-dist.zip -d /
Single Sign On Installation
SSO installation is optional.
Since version 5.13.0, EVSClient needs a file to be integrated with the Gazelle SSO application.
An instance of Gazelle SSO must be deployed, the file evs.properties
shall be in /opt/gazelle/cas and must contain the following statements :
casServerUrlPrefix=https://<yourfqdn>/sso
casServerLoginUrl=https://<yourfqdn>/sso/login
casLogoutUrl=https://<yourfqdn>/sso/logout
service=https://<yourfqdn>/gazelle-token-service
The truststore path must be the path referenced in /etc/init.d/wildfly18, in the option OPT_SSL and -Djavax.net.ssl.trustStore.
Deployment
Once you have retrieved the archive (see Get EVSClient), copy it to your JBoss7
server in the ${JBOSS_DIR}/standalone/deployments directory. The EAR copied in this folder MUST be
named evs.ear.
cp EVSClient-ear-X.X.X.ear /usr/local/wildfly-18.0.1.Final/standalone/deployments/gazelle-token-service-ear.ear
sudo service wildfly18 start
If you did not change any default configuration, Gazelle Token Service should be accessible at http://localhost:8080/gazelle-token-service.
Administration manual
The following elements of Gazelle Token Service can be administrated:
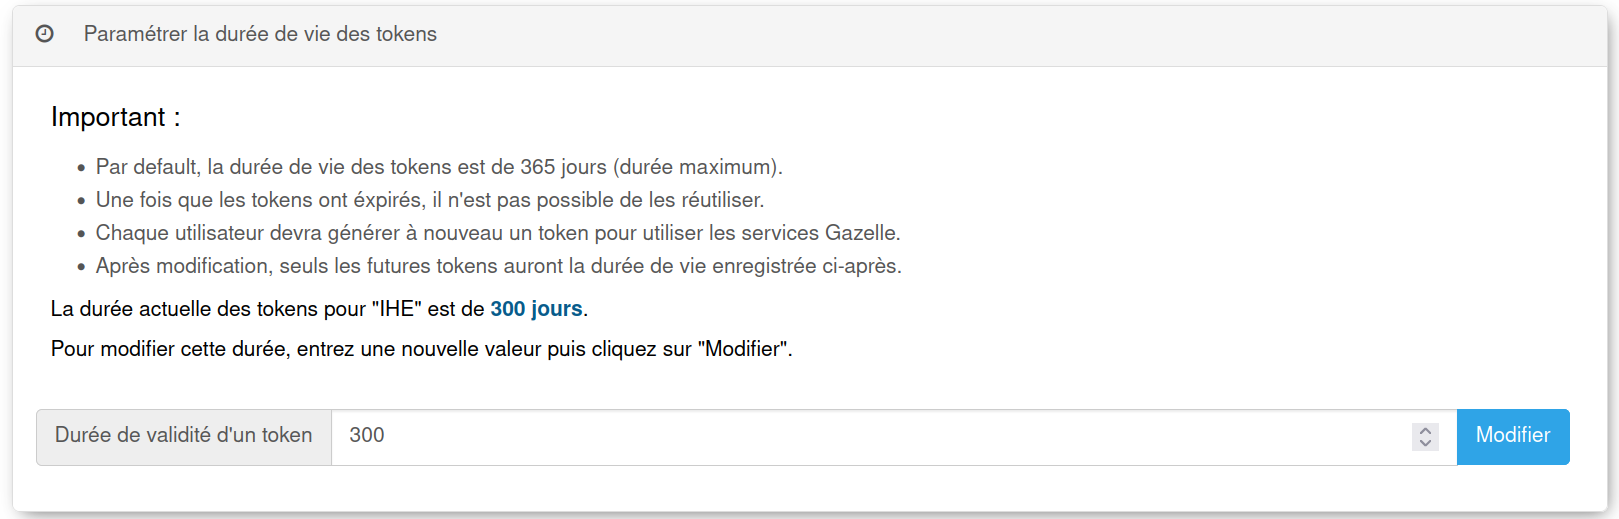
- The token life duration,
Administration panel
Users with admin\_role role can access the admin panel section through the menu
Administration.

Important
- By default, the lifetime of tokens is 365 days (maximum duration).
- Once the tokens have expired, it is not possible to reuse them.
- Each user will have to generate a token again to use the Gazelle services.
- After modification, only future tokens will have the lifespan recorded below.
To modify duration, enter a new value then click on “Modify”.
Authentication
There is no user registry in Gazelle Token Service. Gazelle Token Service is either configured to get authentication token from a Single-Sign-On service (Apereo CAS) either configured to grant admin rights based on IP address filtering.
CAS Configuration
When Central Authentication Service (CAS) is enabled, users identity and roles are provided by Gazelle SSO.
To enable the CAS:
- Preference
cas_enabledmust be set totrue, - preference
ip_loginmust be set tofalse, - property file gathering SSO URLs information must be installed. See Single-Sign-On Installation.
IP Login
WARNING, except on an isolated or secured local network, IP Login is a degraded and unsecure mode and should only be limited to the installation or testing of EVSClient.
If CAS is not available, there is a degraded mode using an IP address based login. If this mode is activated, a click on the login button of the application menu bar will grant the role admin to all users which have an IP address that matches the defined regular-expression.
To enable IP Login:
- Preference
cas_enabledmust be set tofalse, - preference
ip_loginmust be set totrue, - preference
ip_login_adminmust be defined with a regular-expression.*any visitor can be granted admin192\.168\..*any visitor from the network 192.168.. can be granted admin, etc.