CTS
Introduction
FOPH is responsible for providing this guide to the SIA laboratories along with the CTS image to be deployed in the lab.
Purpose
The purpose of this document is to explain how to install, configure and check the installation of the virtual machine provided by FOPH for running SIA test sessions.
Scope
This document and associated Certification Testing System are relevant to the Swiss Interoperability Assessment Scheme (SIAS) 1.3. It is intended to authorized laboratories that will run a SIA test session.
Virtual Machine characteristics
| Linux kernel | 4.9.0-9-amd64 |
|---|---|
| Operating System | Debian GNU/Linux 9.12 (Stretch) |
| Allocated Base memory | 36 GB, 8 CPUs |
| Allocated disk space | 120 GB |
| Virtual machine host name | The one provided when requesting a copy of CTS |
| Networking | How the virtual machine accesses the network must be configured according to your needs and requirements. However, we recommend using a bridge adapter. |
| Main user | gazelle (password : gazelle) is administrator/sudoer |
| Installed applications | Oracle Java 7 (/usr/lib/jvm/java-7-oracle), Java 8 (/usr/local/jdk1.8.0_121), java-1.7.0-openjdk-amd64 |
| Jboss server AS 7.2.0 (3 instances - locations : /usr/local/jboss7, /usr/local/jboss7-proxy, and /usr/local/jboss7-2) | |
| Wildfly 10 AS | |
| postgreSQL 9.6 (user : gazelle) | |
| Apache 2 | |
| exim 4 (SMTP server) | |
| Tomcat8, Tomcat 7 |
Virtual Machine installation process
Installation
You have been providing with a link to a qcow2 compressed file to be download and deployed in a QEMU virtualizer.
Check installation of the Virtual machine
Once the machine is up and running, you should be able to access it in SSH (access with public key only):
\#ssh gazelle@box\_ip
You must also be able to access the index from your favorite browser at https://box_ip.
Note that the following artifacts are being launch at start-up as docker containers:
- Postgresql server;
- Jboss and Wildfly servers (it may take a while);
- Tomcat servers;
- The SoapUI mocks.
Accessing the home page and checking that the version number of the tools are displayed will tell you that the Jboss based applications are up and running.
Configuration
Applications’ URLs and OIDs
The testing environment provided to you has been set up for the URL you provided to FOPH when you requested a copy of the system. An OID was assigned to this instance of the CAS testing environment. If, for any reason, you need to update these values, a script is available and will update the URLs and/or OIDs defined in the database to meet the new URL and/or OID root. To do so, follow the steps below:
- SSH on the virtual machine
- Check you are in the following directory: /home/gazelle
- Edit file vm-packaging/update_for_distribution.sh (vim is installed)
- Update the value of BOX_NEW_URL, it shall match the URL your users will use to access the testing environment
- Update the value of BOX_OLD_URL, it shall match the URL of the previous installation
- Update the value of BOX_NEW_IP, it shall match the IP address of the Virtual Machine
- If desired, update the value of BOX_NEW_OID
-
Save your changes
- Got to vm-packaging and run ./update_for_distribution.sh
The script will restart the docker containers so that the tools will take the changes into account.
Port forwarding
We recommend that you use a bridge to connect the virtual machine to your LAN. However, if you rather need to perform a network address translation (NAT), below is the list of ports which MUST be forwarded:
- For Gazelle Security Suite: 20007, 20009, 20011, 20070, 3001, 3102, 3202
- Apache server: 80 / 443 / 10443 if you use HTTPS
Note that those ports are displayed to the user to facilitate the configuration of his/her system; then, it is a good practice to map the ports with the same number.
Installation of the machine certificate
If the DNS entry was available when the CTS has been configured with your FQDN, a certificate has been requested to Letsencrypt and it has been installed. Otherwise, it is your responsibility to install a certificate for HTTPS accesses.
The truststore of the jboss and tomcat servers need to access the truststore containing the certificate chain to the certificate used. The application servers installed on the machine are already configured to access the truststore.jks file located in the directory /opt/gazelle/cert. So updating that file with the correct chain of certificate is enough. The password of the truststore is set to « password ». If you change this password, you shall update the configuration of the Jboss7 and Tomcat application servers accordingly.
Generate certificates in GSS
Log into Gazelle Security Suite and access PKI > Request a certificate. Fill out the form with the following parameters and hit “Request”.
- Certificate type: Client and Server
- Key size: 4096
- Common Name (CN) shall match the full qualifier domain name of the CTS environment.
- Other mandatory parameters shall fill out to match your organization and country.
- If the system under test supports SNI, you need to generate another certificate for the second hostname that can be used to reach your CTS environment.
Load the certificate on CTS
In Gazelle Security Suite, go to PKI > Certificate certificates and access the details related to the certificates you have requested. From the top right corner of the page, download the certificate (PEM Format), the private key, and the keystore (JKS format) (Password : password, Alias :jboss). Copy those certificates in /opt/gazelle/cert on CTS.
Configure simulators
Replace /opt/gazelle/cert/jboss.jks by the previously downloaded keystore.
ATNA SNI tests
ATNA with SNI extension requires modifications to be performed on the initial library in order to adapt with the testing platform. By default, the library and its certificates are pointing on ehealthsuisse.ihe-europe.net platform. Pre-requisite: section “Generate certificates in GSS” has been completed and you have two new certificates.
- Copy the certificates and private keys into the library’s folder (in /opt/simulators/atna-tls-testing-with-sni/certificates)
- Edit the server SNI script (server-tls-1.0-sni.sh)
- Replace the ehealthsuisse-simu .pem and .keycertificates by the certificates pointing on your testing platform (make sure to keep the “certificates/” mentions in front of the certificate names)
- Replace the test-ihe-europe .pem and .key certificates by the certificates pointing on your second hostname
- Save the script
Apache configuration (port 10443)
ehealthsuisse-simu.key and ehealthsuisse-simu.pem in /opt/gazelle/cert/simu-apache must be replaced by the certificate and the private key previously downloaded.
IDP
Enter the commands (enter ‘password’ when asked):
$> sudo su
$> cd /etc/letsencrypt/live/<domainname>
  $> openssl pkcs12 -export -inkey privkey.pem -in cert.pem -certfile chain.pem -out cert.p12
Then replace idp-backchannel.p12 and idp-browser.p12 in /opt/shibboleth-idp/credentials by cert.p12 Finally,restart docker :
$> sudo docker restart shibboleth-idp
Open docker log :
$> sudo docker logs shibboleth-idp
If there are errors you will need to restart apacheds then restart the IDP :
$> sudo service apacheds-2.0.0-M24-default stop
$> sudo service apacheds-2.0.0-M24-default start
$> sudo docker restart shibboleth-idp
Configure TLS simulators in GSS
psql -U gazelle gss -c "UPDATE tls_simulator SET certificate_id = <id_of_the_new_certificate> WHERE certificate_id = 23"
Where
Restart all docker
docker restart authentication-simulator ch-iua-validator epr-access-token-provider epr-adr-simulator epr-assertion-provider-simulator epr-atc-simulator epr-ppq-repository epr-restricted-metadata-update-update-document-set epr-restricted-metadata-update-responding-gateway epr-restricted-metadata-update-registry-stored-query epr-xca-responding-gateway epr-xds-registry gazelle-assertion-manager gazelle-autoheal gazelle-cda-generator gazelle-dds gazelle-documentation gazelle-evsclient gazelle-fhir-validator gazelle-front gazelle-hl7v2-validator gazelle-hpd-simulator gazelle-patient-manager gazelle-patient-registry gazelle-pixm-connector gazelle-reverse-proxy-apache2 gazelle-schematron-validator gazelle-security-suite gazelle-sso gazelle-sts gazelle-svs-simulator gazelle-tm gazelle-webservice-tester hapi-fhir-jpavalidator idp-adapter shibboleth-idp xdstar-client
Check access to the tools
From https://your_box_url, you should access the following page (Apache front-end) which lists the available applications, their links, and the links to their user manual.
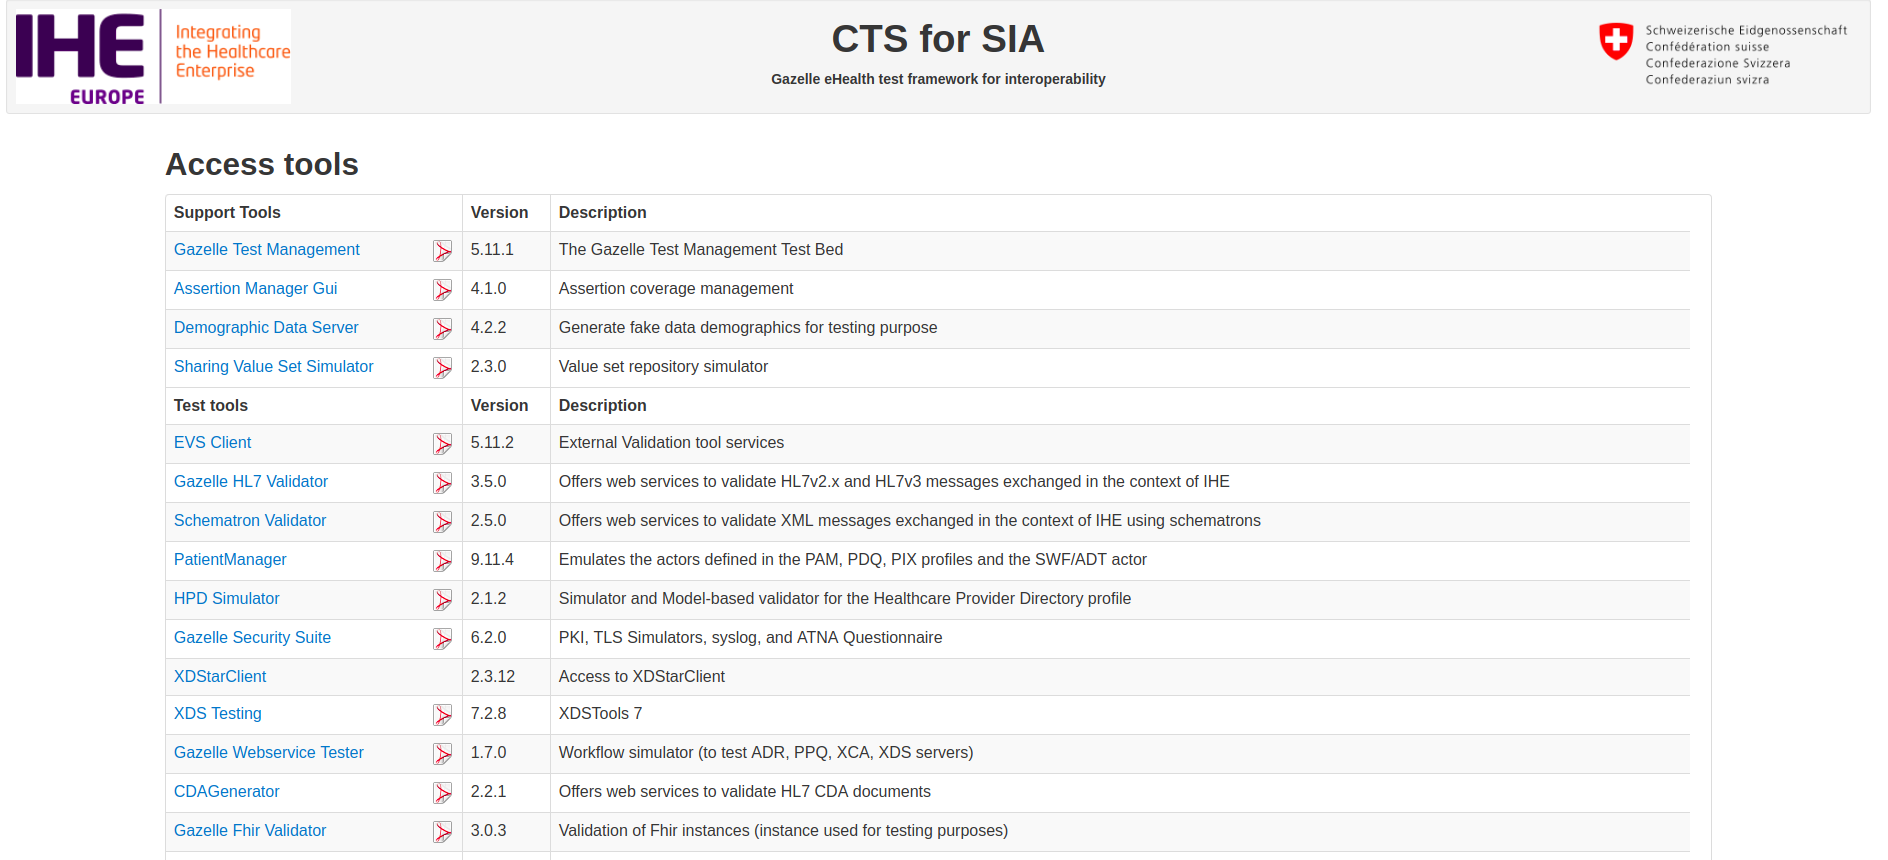
Check you have access to all the tools. When you access the tool for the first time, the loading of the page could appear to be quite long because the tool is being initialized.
Login
A Central Authentication Service has been set installed and configured. You will be able to create new accounts. To access the tools for the first time, use the default account:
Username: admin
Password: 123456
Role: admin_role
Once you have created your own account (with admin_role role at least) and make sure you disable the admin account or change its password.
Jboss management
jboss7 can be replaced by jboss7-2, jboss7-proxy or wildfly 10 depending on the Jboss application server you need to start/stop/restart.
| Command | Description |
|---|---|
| sudo service jboss7 start | Starts the Jboss7 default server (requires gazelle’s password) |
| sudo service jboss7 stop | Stops the Jboss7 process (requires gazelle’s password) |
| sudo service jboss7 restart | Stops the Jboss7 server and after a while starts it again (requires gazelle’s password) |
Gazelle tools
User guides
Documentation for the tools that are installed on the virtual machine can be found at YOUR_SERVER_URL/gazelle-documentation. On the home page, a direct link to each page of the manual is available (PDF icon).
Included tools
The following tools are installed on the virtual machine:
- Gazelle Test Management (configured to work as Test Management and Gazelle Master Model) is the tool used during the connectathons. It is used to manage the users, the systems under test and the test sessions. SIA conformance tests are also stored in this tool. It embeds the SIA test cases and the IHE concepts.
- Patient Manager is a simulator which integrates the IHE profiles which deals with patient and encounter management (CH:PIXV3, CH:XCPD, and CH:PDQV3 are configured)
- SVS Simulator is a simulator for the SVS profile. It is used by the other applications of the Gazelle test bed as a value set repository.
- Gazelle HL7 Validator is a validation tool for HL7v3-based messages
- Assertion manager Gui gathers the assertions extracted from the IHE Technical Framework and EPR specifications
- XDSTools is aimed to test the systems implementing the XDS.b, XCA, XDS-I.b and XCA-I integration profiles
- Gazelle Security Suite gathers features to test the CH:ATNA integration profile
- Demographic Data Server is used to generate fake demographics for testing purposes
- EVS Client is the graphical interface to Gazelle validation services.
- Gazelle Webservice Tester has been designed with the purpose of executing SoapUI projects against the systems under test. It also stores the message exchanged between the systems under test and the SoapUI mocks
- Schematron Validator is a schematron-based conformance checker
- HPD Simulator emulates the CH:HPD actors and offers a validation service for the messages produced in the context of this profile
- XD* Client offers validators for verifying the conformance of the XD* messages
- CDA Generator owns the validator for the CDA SDCO documents
- Gazelle FHIR Validator provides validators for the messages exchanged in the context of the CH:ATC profile
- Authentication Simulator
- CAS service for singe-sign-on login
- Nagios is a service monitoring configured to check the availability of the tools installed in the virtual machine
- A number of SoapUI mocks are also available, they emulates EPR actors playing the role of responder:
- Assertion Provider
- ADR Provider
- PPQ Repository
- Metadata Update Responder
- ATC Patient Audit Record Repository
- XDS Document Registry
- XCA Responding Gateway
- A library for TLS tests with SNI extension used to test authentication with this extension.
The following binaries are deployed in the Jboss7-2: /usr/local/jboss7-2/standalone/deployments directory.
| Application | Binary name | version | Database |
|---|---|---|---|
| Demographic Data Server | DemographicDataServer.ear | 4.2.2 | demographic-data-server |
| EVS Client | EVSClient.ear | 5.12.1 | evs-client-prod |
| Gazelle Webservice Tester | gazelle-websesrvice-tester.ear | 1.7.1 | gazelle-webservice-tester |
| Schematron Validator | SchematronValidator.ear | 2.5.0 | schematron-validator-prod |
| Authentication Simulator | authentication-simulator.ear | 0.1.2 | authentication-simulator |
The following binaries are deployed in Jboss 7-proxy server: /usr/local/jboss7-proxy/standalone/deployment/.
| Application | Binary name | version | Database |
|---|---|---|---|
| Assertion manager Gui | AssertionManagerGui.ear | 4.1.0 | assertion-manager |
| Test Management | gazelle-tm.ear | 5.12.1 | gazelle |
| Patient Manager | PAMSimulator.ear | 9.11.7 | pam-simulator |
| SVS Simulator | SVSSimulator.ear | 2.3.0 | svs-simulator |
| Gazelle HL7 Validator | GazelleHL7v2Validator.ear | 3.5.1 | gazelle-hl7-validator |
| Gazelle Security Suite | gazelle-gss.ear | 6.2.4 | gss |
The following binaries are deployed in Jboss 7 server: /usr/local/jboss7/standalone/deployment/.
| Application | Binary name | version | Database |
|---|---|---|---|
| CDA Generator | CDAGenerator.ear | 2.2.1 | cda-generator |
| HPDSimulator | HPDSimulator.ear | 2.2.1 | hpd-simulator |
| XDStarClient | XDStarClient.ear | 2.5.4 | xdstar-client |
| IDP Adaptor | idp-adapter.ear | 0.1.1 | NO DB |
The following binaries are deployed in tomcat 8 server: /var/lib/tomcat8/webapps/
| Application | Binary name | version | Database |
|---|---|---|---|
| XDSTools7 | xdstools7.war | 7.2.8 | NO DB |
| Apereo CAS | sso.war | Connect to gazelle |
The following binary is deployed in Wildfly 10 server: /usr/local/wildfly10/standalone/deployments
| Application | Binary name | version | Database |
|---|---|---|---|
| Gazelle FHIR Validator | FhirValidator.ear | 3.0.3 | gazelle-fhir-validator |
All the web services required by the applications are on the virtual machine. No access will be done to Gazelle’s servers.
Monitoring of services
The test environment is delivered with Nagios3 tool configured to check the availability of the services available in the testbed. You will access it from the Nagios Monitoring link of the home page. Default username and password have been set to nagiosadmin/gazelle.
Calibration
For some applications, calibration scripts have been set up. To check the proper configuration of your environment or to check the environment is calibrated, you can access the administration page at YOUR_SERVER_URL/admin.php. Details on how it works are given at YOUR_SERVER_URL/gazelle-documentation/Gazelle-Calibration/user.html.
Backups
The backup of the databases (and ONLY the databases) is performed automatically. In the home directory of gazelle (/home/gazelle) there is a folder called backup. In that folder there is a script called backup.sh which is executed once a day thanks to a cron
@daily /home/gazelle/backup/backup.sh
We use then logrotate in order to keep:
- a back up for the last 7 days
- a back up for the last 4 weeks
- a back up for the last 12 months
For each database we create
- a dump,
- a SQL dump of the definition,
- a SQL dump of the data
Running a SIA testing session
A number of pre-requisites are given below which will help the testing session manager to conduct correctly a SIA testing session.
Testing session definition
The CTS is provided with a testing session entitled “Default CA Testing Session”; this includes all you need to run a session. If you need to create a new testing session, make sure that, when you define this new testing session, you include the list of integration profile to be tested. You shall also select “conformity assessment” as testing session type; this will allow the participants to see the tests defined for in SIAS.
Testing tools
Conformity assessment testing is run against tools, some of them have to be declared as such in Gazelle Test Management.
The “Defaut CA Testing Session” session includes those tools. To import them into a newly created testing session, you need to
- Go to Administration > Manage > Systems > System Management
- Click on “Import systems from a previous testing session”
- Select company with keyword = IHE
- Select the tools to import
- Click on Import
System acceptance
To allow the SUT operator to see the tests to be performed for his/her system, you need to accept it in the testing session. To do so, go to Administration > Manage > Systems > System acceptance and hit the checkbox for the systems to be included in this testing session.
Testing against central services
Testing of the UPI and CH:CPI profiles requires that the systems under test establish a connection respectively to ZAS and BIT central services. It is then the responsibility of the testing laboratory to contact those services to get the log of the exchanged messages in order to verify that the messages sent by the systems under test complies with EPR specifications.
Please note that there is not legal agreement that bounds the SIA Laboratory with ZAS and BIT.
The following sections give you guidance regarding the prerequisite to test against those services.
Testing UPI against ZAS
The conformity assessment tests for the UPI profile are run against ZAS UPI service. Only members from the federal organizations are allowed to access the GUI of the UPI system where the logs of the testing reside. In other words, as a laboratory, you will not have a direct access to the messages exchanged between the system under test and the UPI service. One week in advance of the testing session, you are expected to notify ZAS that you are going to conduct a SIA test session and that you requested their help to fetch the test logs.
During the execution of the conformity assessment tests for UPI, the SUT operators is requested to provide the demographics of the patients they used in the test steps. To help ZAS to gather the messages of relevance for you, please populate the spreadsheet “UPI_Logs_request_to_ZAS.xlsx” (available under the test data section of CTS).
Once ZAS has gathered the message to you, they will send you the XML file along with the original spreadsheet updated with the file name. Upload the messages in the relevant test steps and ask the SUT operators to validate them using EVS Client.
Testing CH:CPI against BIT
The conformity assessment tests for the CH:CPI profile are run against the BIT CPI Provider. Only members from the federal organizations are allowed to access the GUI of the CPI system where the audit logs of the testing reside. Also BIT CPI Provider requires an operational action to enable logging full traces (complete payload of messages). In other words, as a laboratory, you will not have a direct access to the messages exchanged between the system under test and the CPI Provider.
One week in advance of the testing session, you are expected to notify BIT that you are going to conduct a SIA test session and that you requested their help to fetch the test logs. The day of the execution of CH:CPI, you must notify them the precise CH:CPI testing hours for enabling/disabling the traces. Once the testing over, you should receive from BIT the complete traces logged during the given hours. It is the lab’s responsability to find the messages sent by the SUT and upload them in the relevant test step (SUT operators are requested to provide timestamp, IP/host and query information for helping this process).
In case of technical issues (request from the SUT operator failing), BIT can be contacted to have a look at their monitoring interface. This interface provides summary information of request attempts and complete audit logs that can help troubleshooting faster. FOPH also have an access to this interface.
Testing TLS with SNI extension
ATNA profile specification authorizes the use of SNI extension in TLS tests (multiple hostnames with one IP address). However, the current TLS simulator in GSS does not support this extension. This may cause a failure in TLS tests with systems requiring SNI. A temporary workaround with a tool dedicated to test that case has been set up. This tool is named “atna-tls-testing-with-sni” and its directory is located in “/opt/simulators”. A README file has been created at root directory level to guide monitors through the testing process.
Prior to perform this test, monitors must ask participants to provide them with an additional DNS entry specifically for SNI extension testing. As mentioned in SIA test cases in Gazelle Test Management, monitors are asked to provide the logs retrieved from the tool as evidence in test steps.
Annex : Cloning process
The CTS is obtained from the Reference Environment 1.2.
Clone the virtual machine of the reference environment. Start it
Download the packaging scripts on the VM from the SVN repository : https://svn.ihe-europe.net/gazelle/scripts/vm-packaging/branches/CTS
svn checkout https://svn.ihe-europe.net/gazelle/scripts/vm-packaging/branches/CTS packaging-scripts/
There is two main scripts :
- cleanup_data_for_distribution.sh : Delete all data not needed for the CTS
- update_for_distribution.sh : Update all the URLs, IP address and OIDs
Both need to be executed with root access (sudo).
First, execute the clean up scripts :
sudo ./cleanup_data_for_distribution.sh
Before executing the second script, some parameters need to be updated. Open the update_for_distribution.sh and update the following properties :
- BOX_NEW_URL= the url for the CTS VM
- BOX_NEW_OID= the oid for the CTS VM
- BOX_NEW_IP= the ip for the CTS VM
- ADMIN_NAME= The admin name in Gazelle Test Management
- ADMIN_TITLE= The admin title in Gazelle Test Management
- ADMIN_EMAIL= The admin email in Gazelle Test Management
The following properties should not be changed as they are the url of the reference environment (it always be https://ehealthsuisse.ihe-europe.net) and the old hostname :
- BOX_OLD_URL
- DEFAULT_BOX_HOSTNAME
Save the file, then execute update_for_distribution.sh with sudo :
sudo ./update_for_distribution.sh